If you can see this text here you should update to a newer web browser
Normal | Highlight & Comment Highlighted Text are in Yellow
|
|
U.S.S. TENNESSEE BOMB DAMAGE December 7, 1941 Pearl Harbor
List of Photos
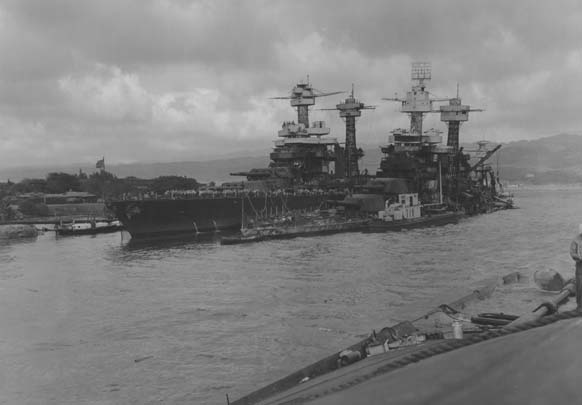
List of Plates I Location and profile of TENNESSEE
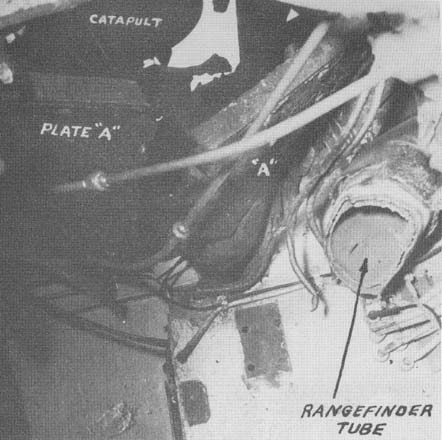
|
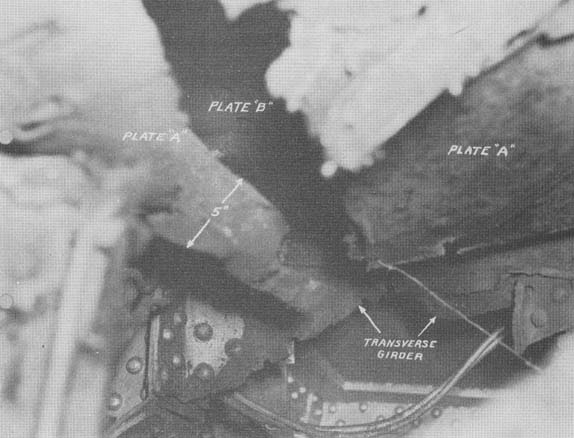
|
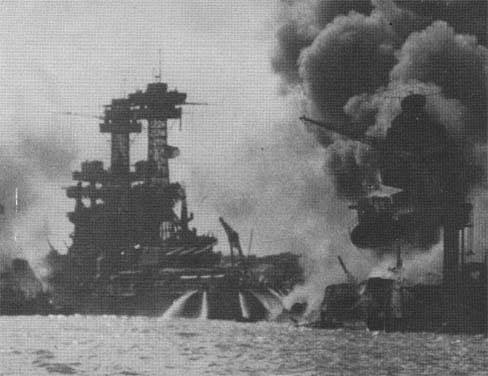
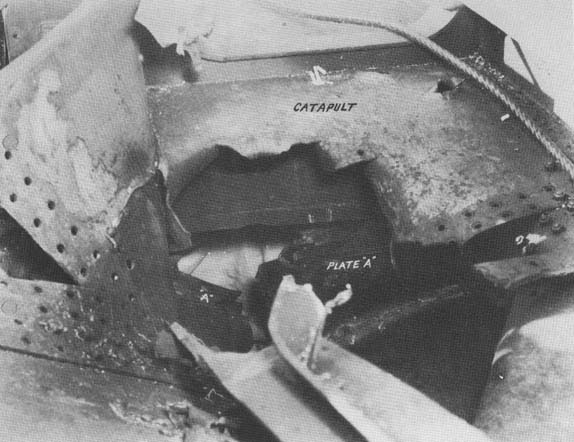
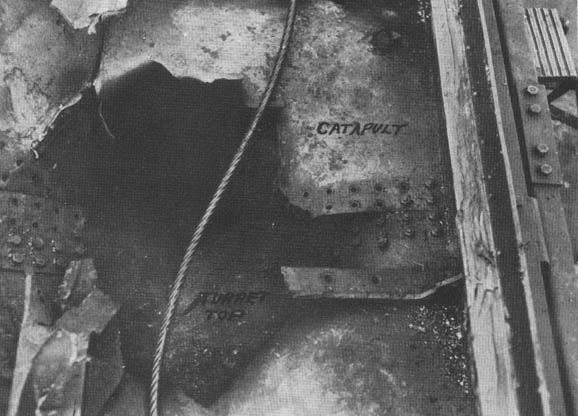
Section I - Narrative 1. On the morning of Sunday, December 7, 1941, U.S.S. TENNESSEE was moored with her starboard side to the quay at berth F-6, Pearl Harbor. U.S.S. WEST VIRGINIA was moored alongside, ARIZONA astern, and MARYLAND and OKLAHOMA ahead as shown on Plate I. The wind was force 2 on the port quarter, about 080°T. The average depth of water at berth F-6 was about 40 feet. Boiler No. 1 was steaming for auxiliary purposes. 2. About 0755, planes, determined to be Japanese by their markings, were observed dive bombing on Ford Island. General Quarters was sounded at once and the ship started setting Condition Zed and preparing to get underway. Almost immediately about 15 torpedo planes came in low over the repair basin and docks on the other side of the channel and delivered a torpedo attack on the battleships. Several torpedoes hit WEST VIRGINIA and she started to list rapidly to port. Quick counterflooding stopped her at about 28° and she came nearly upright and settled to the bottom. OKLAHOMA was torpedoed and capsized outboard of MARYLAND in about ten minutes. 3. Simultaneously with and following the torpedo attack planes were bombing from high altitude, dive bombing, and strafing the battleships. Several bombs hit ARIZONA and her forward magazines blew up about 0830 (actually about 0807), showering TENNESSEE'S quarter deck with burning powder, oil, and debris. About this time TENNESSEE herself received two bomb hits, apparently from high level bombers at about 10,000 feet. One hit and exploded on the center gun of No. 2 turret and the other penetrated the top of No. 3 turret, broke up and did not explode. WEST VIRGINIA was also hit by bombs, both of which failed to detonate, and was on fire from her numerous torpedo hits. TENNESSEE was ready to get underway on 6 boilers by 0900, but she was blocked in her berth by the events described above. 4. Large surface oil fires were raging around TENNESSEE'S stern and port quarter, fed from both ARIZONA and WEST VIRGINIA. This started numerous fires on the main deck and in the wardroom country on the second deck, but these were under control by about 1030. Port side magazines D-306-M, D-310-M, and D-312-M were deliberately flooded when they became hot from the surrounding fires. The projectile room, D-316-M and 4 magazines on the
|
||||||||||||||||||
|
starboard side vere apparently not considered in any immediate danger and were not flooded. This left turret IV with over half the ammunition available. Hoses were led out to fight the fires on WEST VIRGINIA also and this continued throughout Sunday and Sunday night. 5. About 1030 it was decided to move TENNESSEE forward to escape the fires around the stern and the engines were turned over for five knots with no results, WEST VIRGINIA having wedged TENNESSEE tightly against the quays. The engines were kept turning for from five to ten knots and fire hoses played over the stern to wash the burning oil away throughout Sunday and Sunday night. 6. TENNESSEE was finally freed on December 16 by cutting away the concrete tops of the quays sufficiently to clear her and allow her to get out by going inside OKLAHOMA. She then moved into the Navy Yard for limited repairs. Section II - Bomb Hit - Turret III 7. Both bombs which hit TENNESSEE were dropped about the same time. The bomb which hit Turret III penetrated the turret top, but it broke up and did not detonate. It was apparently dropped from about 10,000 feet by a plane coming in from about 50° on the starboard bow. The angle of fall was about 75°. The bomb probably struck the after starboard yard of the main mast, which was carried away, and then passed through the catapult on turret III, striking the turret top about five feet from the back plate and three feet in from the left side plate, the turret being trained 180°. 8. The turret structure in the vicinity is shown on plate II. The roof is made up of 5-inch STS plates with seams extending transversely across the turret. These plates are fitted together by scarf joints; the rear plate marked "A" on plates and photos, being bolted to the underside of the next plate, marked "B". As shown on plate II there is a heavy built up transverse girder supporting plate "B" about a foot and a half from this seam. The bolts used in the seam were originally bronze, but were partly replaced by steel. Complete replacement had not been made owing to the presence of the catapult foundation. 9. The bomb apparently struck the left edge of the catapult and bent the sides outward, shearing the bolted seam as shown in plate II and photo 3. It tore a hole about 3 feet by 4 feet in the 10-lb. plating Photos 3 and 4 and then hit 5-inch plate "A". A few pieces were knocked off and projected upward through the catapult plating and the bomb started to punch a hole through the turret top. It made about a two-inch dish in plate "A" and the armor bolts gave way by breaking or pulling through, allowing the front edge of the plate to drop, and creasing the plate in line with the impact of the bomb. The plate then tore along this crease as shown on plate II and in photos 3, 5, and 6. The bomb was deflected forward and broken up. Fragments and filler passed through the hole opened up by failure of the seam connections and fell onto the shell table and rammer in the left gun chamber. These fragments consisted of the nose intact and weighing about 300 lbs., and various other pieces, each about 200 lbs. in weight. Damage inside the turret was primarily due to these large fragments. - 2 - |
|
16. When this bomb struck it detonated vith a brief, intense flash and fragmentation was apparently good, no fragments over 2 pounds in weight being recovered. Fragment damage was widely distributed but not serious, largely because there was nothing in the immediate vicinity to be damaged. (1) Turret and guns - The center gun and face plate only had the paint scratched but the right and left guns were quite heavily pitted and gouged from 36 ft. to 40 ft. from the muzzles, the deepest pits being 1/2 inch deep about 38 feet from the muzzles. The slides of the right and left guns had small craters in them with the edges raised about 1/8 inch. These would probably have jammed the guns in the slides if they had been fired while in this condition. These raised areas were filed off smooth. (2) Air Defense Platform - This is above the pilot house and about 75 feet from the explosion. Two fragments struck the 25 lb. STS bulwark here and made small dents. One fragment struck the 5-lb. windscreen, made a one-inch dent and caused a 4-inch tear in a butt welded joint. (3) Pilot house, also about 75 ft. from the explosion - Two fragments, each about 2 lbs. in weight passed through the pilot house overhead. One went through the 10-lb. web of an I beam, a 5-lb. bulkhead, and was stopped by a 10-lb. bulkhead faced with an inch of cork insulation. The other bounced off several fittings and was stopped by the same cork covered bulkhead. Several electric cables were cut by these fragments. (4) Conning tower platform about 40 ft. from the explosion - About twelve fragments-struck the 5-lb. windscreen of the platform around the conning tower where two 50 cal. machine guns were mounted. Eight of these fragments penetrated the screen, making holes from 2 inches to 5 inches in diameter. The other 4 fragments only dented the screen. Those which penetrated severed a few telephone cables, carried away a gyro compass repeater, broke a piece off one machine gun mount, and caused two casualties. (5) Upper deck, 40-45 feet from explosion - There were about ten holes through the 3" wood and 10-lb. plating on the port side of the upper deck between frames 37 and 40 and a few holes in the wood. A chock at frame 7 (port) and a stanchion at frame 10 (port) were broken, probably by fragments. No fragment effect was observed on the starboard side. (6) It is also probable that fragments from this bomb caused one casualty on the starboard wing of WEST VIRGINIA'S bridge. 17. The impact of the bomb on the center gun caused considerable damage to the gun and slide. The gouge in C and B hoops has been described in paragraph 15. The C hoop was cracked from this gouge to the forward end as shown on plate II and photos 7 and 8. Several large pieces of C hoop were almost knocked free and there was a constriction of about 1 inch in the bore under the gouge. The slide was cracked completely through - 4 - |
|
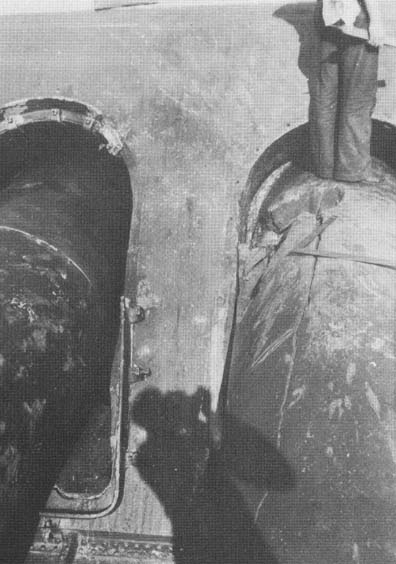
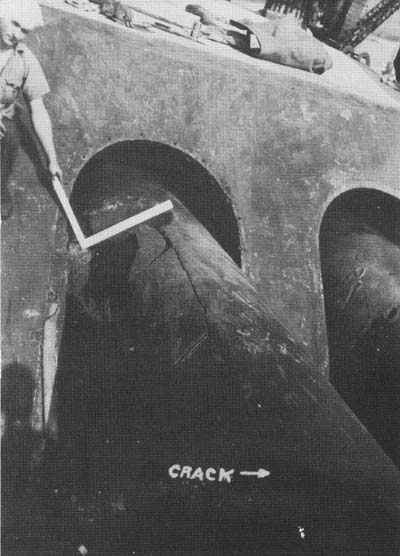
on each side, the cracks extending axially through the gun port shield and aft under the trunnions, where they were about 3/4 of an inch wide, to a point about 3 ft. abaft the trunnions, then upward to within about a foot of the top of the slide. These cracks allowed the lower forward part of the slide to sag under the weight of the gun until the gun port shield rested on the face plate at the gun port. This sagging spread the upper part of the slide outward, forcing the center slide trunnions outboard and pushing the wing guns outboard against the deck lugs. There was apparently no damage to elevating gear or gun telescopes and the wing guns appeared to be fully operable. It is interesting to note that the impact of the bomb apparently forced the gun and turret sharply to the left causing the wing guns to "whip". This was apparent at the forward end of the C hoops as cracked paint on the right sides of the B hoops but in no other way. 18. There was little damage from blast, primarily because there was no light structure in the immediate vicinity to be damaged. Four inch coamings around the gun ports, visible in photo 8, were torn loose and jammed between the guns and the face plate, thus putting the guns out of action temporarily. These coamings were bolted on the face plate for securing turret bloomers. Flames were reported to have entered the turret through the center gun telescope ports for several feet but these did no damage. The pointer and trainer in the center pit received no injury other than temporary shock. Bridge windows were blown in with a shower of glass splinters. These windows were apparently the original plate glass and have since been replaced by shatterproof glass. Section IV - Fire and Other Damage 19. The most extensive damage on the ship was caused by the fires in and around the stern. These fires were started and kept burning by fragments and burning debris which fell on the stern from ARIZONA, and oil fires blown down on the water. Although, as stated in paragraph 3, these fires were under control by 1030 Sunday and hoses were continually played over the stern with the engines going ahead, the heat was sufficient to start a fire in the after crane room about 1800 Sunday. This fire was brought under control by 1930 but the danger from oil fires on the water still existed on Monday and Tuesday. 20. Considerable hull damage was done by the fires on the water from frame 104 to the stern on both sides. All plating above the waterline was warped and buckled, seams opened, and rivets loosened. When the ship obtained temporary repairs approximately 500 ft. of open seams and the points of 700 rivets were welded. Considerable recaulking was necessary. Regular ports in this area had the lenses fused, and gaskets burned out. The welding of one of the blanked ports pulled apart due to distortion of the shell. The main deck was buckled on the port side between frames 127 and 130, and deck planking was charred and burned from frame 136 to the stern. The stern crane electrical system was put out of operation by these fires. One interpole was grounded by flooding, the remote control system burned out, and the power lead burned out on the second deck. The Q coil and quarter deck section of the M coil of the degaussing circuit were destroyed. - 5 - |
|
21. Inside the ship the second deck was gutted by fire aft of frame 112. Electrical circuits, including lighting and I.C. circuits were burned out and telephones and equipment burned. What was undamaged by fire was water-soaked by the fire fighting and had to be replaced. In magazines D-306-M, 310-M, and 312-M cable was soaked and cork insulation loosened by the water incident to flooding these spaces. 22. When the ship was docked for final repairs a dent was uncovered on the port side amidships. This dent was about 40 feet long and 14 feet wide. The deepest point was about 5 feet below the armor belt at frame 64 and was about 6 inches deep. This dent was probably caused by WEST VIRGINIA when she heeled over to port. When WEST VIRGINIA was docked a long crease was found in her hull just above the turn of the starboard bilge where she had apparently come up against the bottom edge of the armor belt on TENNESSEE'S port side. The turn of the bilge beneath this crease probably made the dent in TENNESSEE'S hull. 23. The design of the seam between turret plates "A" and "B" is of interest. The stress of impact on top of plate "A" was carried in tension through the armor bolts to plate "B" and to the supporting transverse beam. Had the flange of plate "A" been on top of plate "B" the stress would have been transmitted directly to plate "B" and the bolts would not have failed. The bomb would probably have broken through anyway, but the performance of the armor would undoubtedly have been better. 24. Fragments collected from this bomb indicated that it was similar to one which was recovered from turret III on WEST VIRGINIA and reconstructed and also to one which was recovered intact on that ship. These bombs were apparently 16-inch projectiles converted for use as bombs by tapering the after portion about 3 inches and by fitting two base fuses and a tail. They were 16.1 inches in diameter, 5 calibers long, and weighed 1575 lbs. without the tail. The charge weight was 66.5 lbs. The penetrating action of the bomb which hit turret II indicates that it was probably of the same type. 25. It is interesting to compare the fragment effect of the bomb which hit turret II with the one which hit CHESTER on February 1, 1942, (See BuShips War Damage Report No. 10, dated April 10, 1942, USS CHESTER). The bomb which hit CHESTER was apparently a light bomb with an instantaneous fuse and fragment effect was severe, 17-1/2 lb. plating 60 feet from the explosion being penetrated in numerous places and 10 lb. plating 84 feet away being punctured. It has been determined from tests that most of the fragments from a shell or bomb explosion are projected forward in a cone and outward in a belt roughly 90° to the bomb axis. CHESTER afforded a good example of this, the major portion of the fragments being projected horizontally and fairly close to the deck. It is this performance and the location of the hit on turret II which explains the distribution and relatively small amount of fragment damage on TENNESSEE. The only structure in the immediate vicinity was heavy armor plate and this was only marked by fragments in concentrated areas. - 6 - |
|
It is probable that most of the fragments went overboard, particularly the large pieces which generally result when a bomb or shell of the armor piercing type explodes. It also appears that some pieces may have been heaved overboard by the repair parties. 26. An interesting point brought out in reference (a) is the fact that except in small isolated cases the linoleum on decks aft did not burn; even in the areas exposed to greatest heat. 27. The cases of lung trouble encountered in dealing with the damage in turret III give a graphic illustration of the care needed in dealing with damage caused by an explosion in a confined space where the gases cannot be dissipated. In all such cases rescue breathing apparatus should be used until the space is thoroughly ventilated and cleared. 28. At the end of the day TENNESSEE was immobilized by being pinned against the quays. The high catapult and after airplane crane were out of commission, and the three planes attached to the ship had been destroyed on Ford Island. Damage had been done to the bridge and forward machine gun platform but this in no way affected the fighting condition of the ship. The ship's main propulsion machinery, power and light, secondary battery and anti-aircraft armament were intact and ready and the main battery was ready for action except for the center gun of turret II and the left gun of turret III.
- 7 - |
|
|
|
|
|
|
|
|
|
Damage Plate I
Click to enlarge 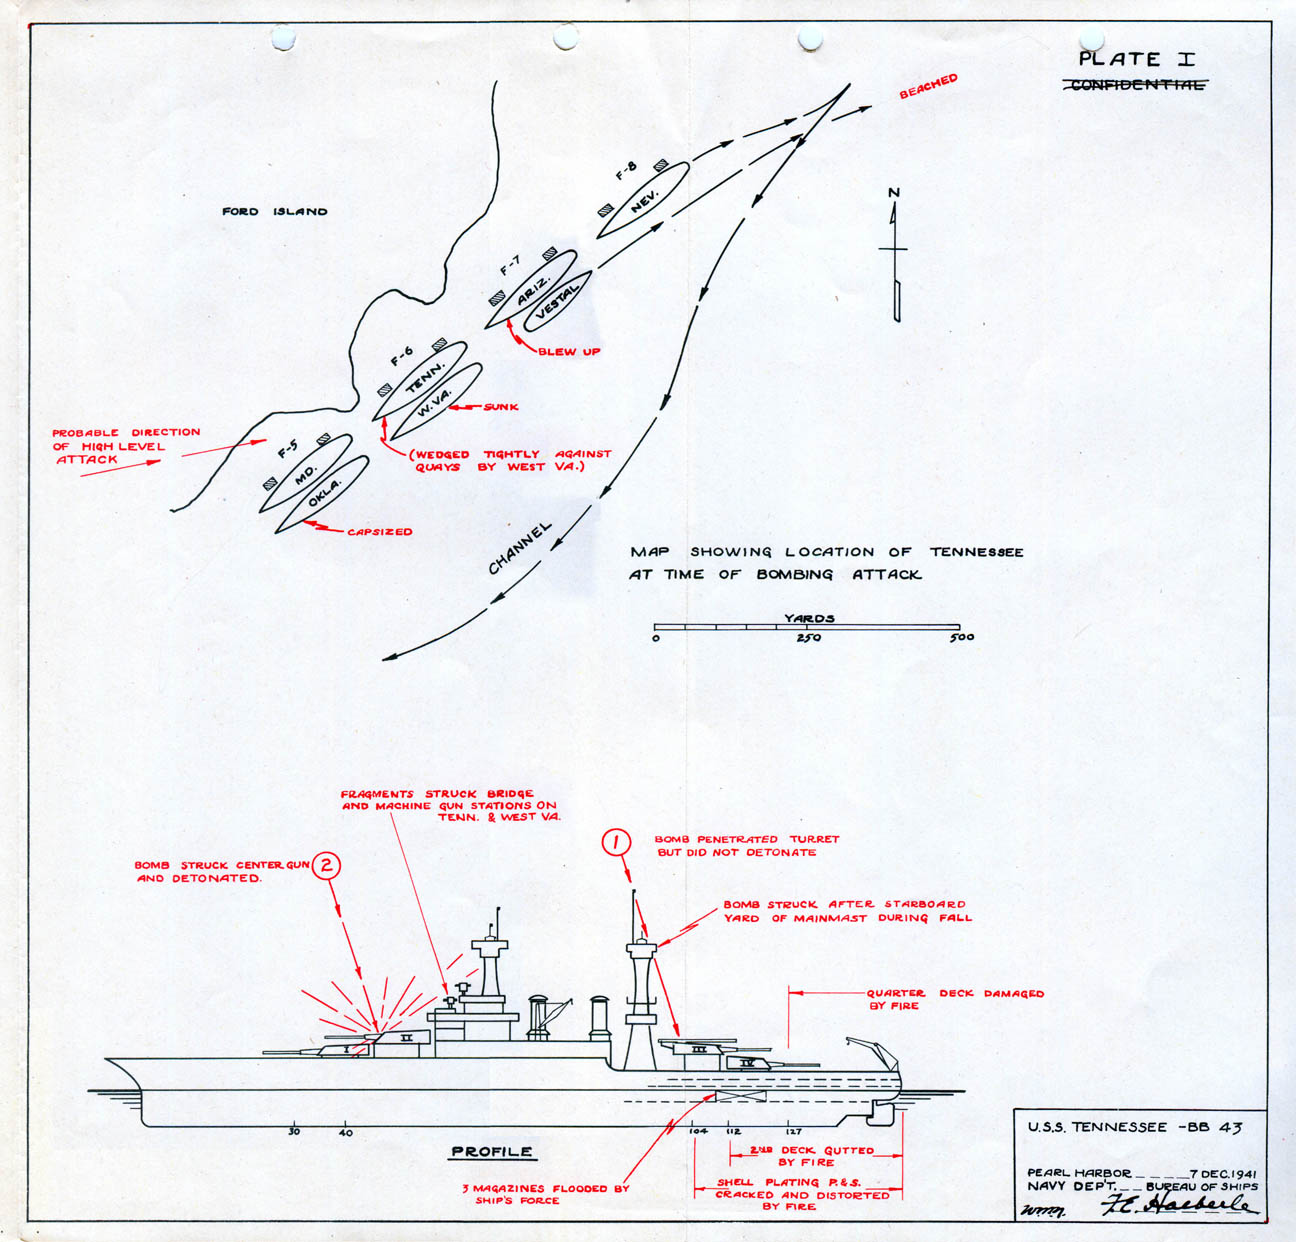 |
|
Damage Plate II
Click to enlarge 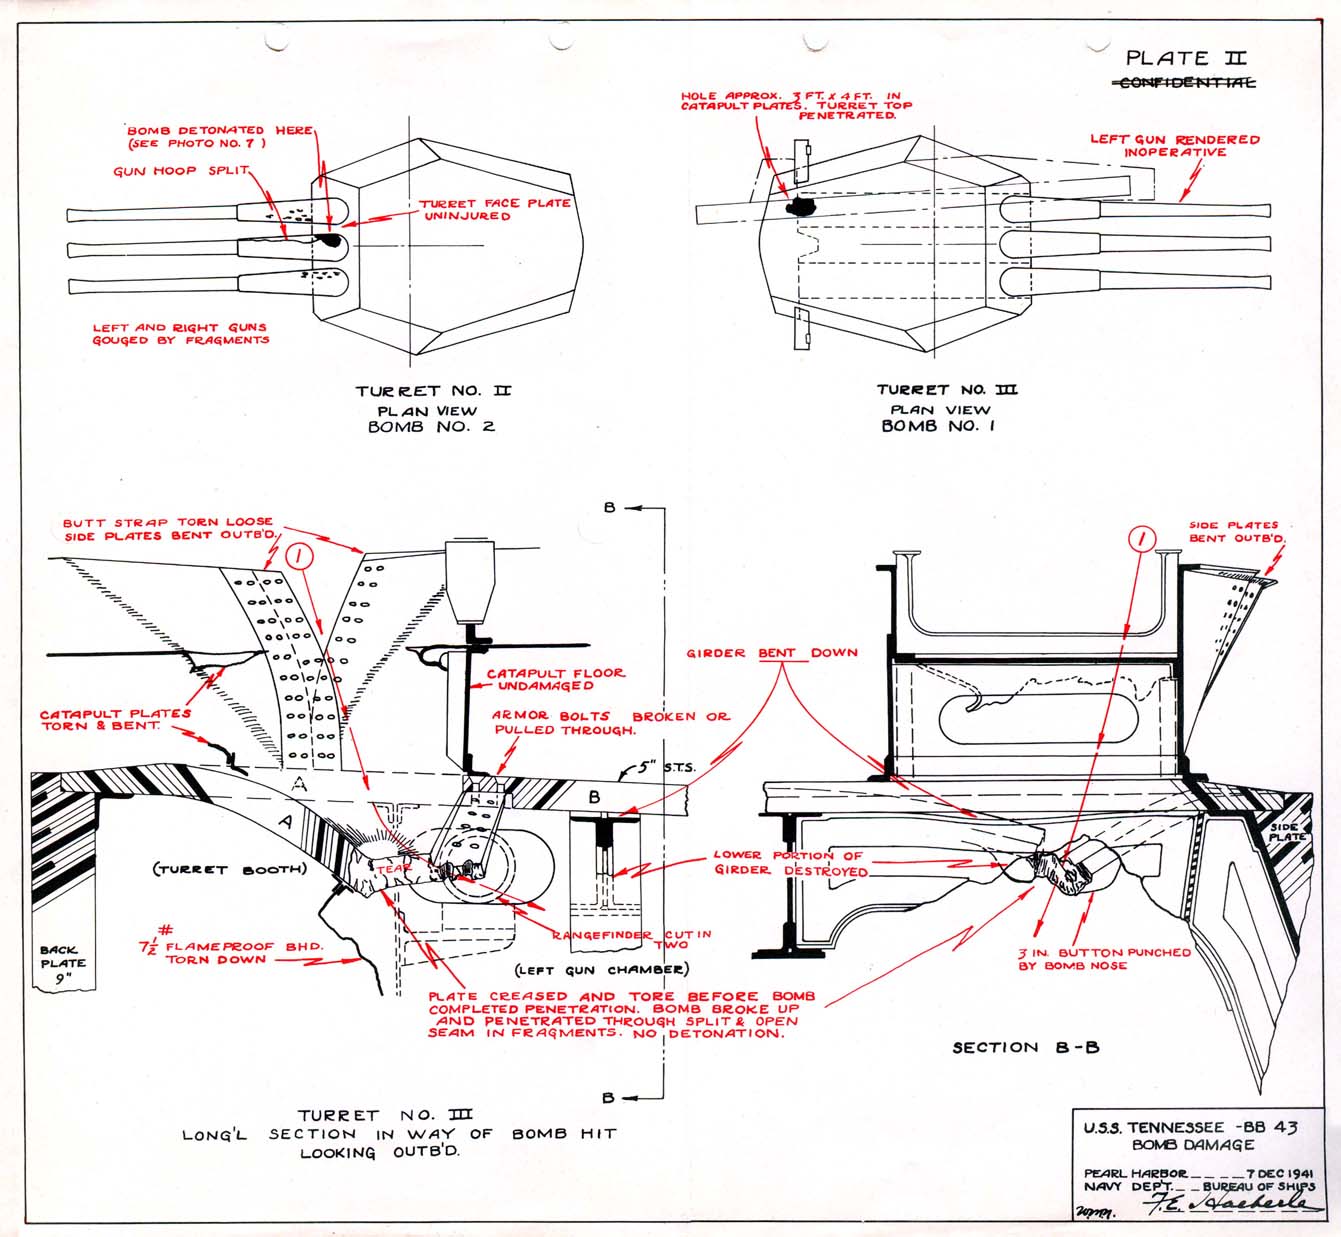
|
SOURCE:
Transcribed by RESEARCHER @ LARGE. Formatting & Comments Copyright R@L.